JSON file is a type of computer file based on Java that is easy for humans to read and write. JSON file is used by the GSTN for GST return preparation and filing. GST returns can be filed on the GST Portal using a JSON file. The Government has provided an offline GST return preparation tool that generates JSON file that can be filed on the GST Portal. LEDGERS GST software also provides JSON format GST returns that can be uploaded to GST portal for easily filing all types of GST return. In this article, we look at the procedure for uploading JSON file on GST portal.
Download JSON File for GST Return Filing
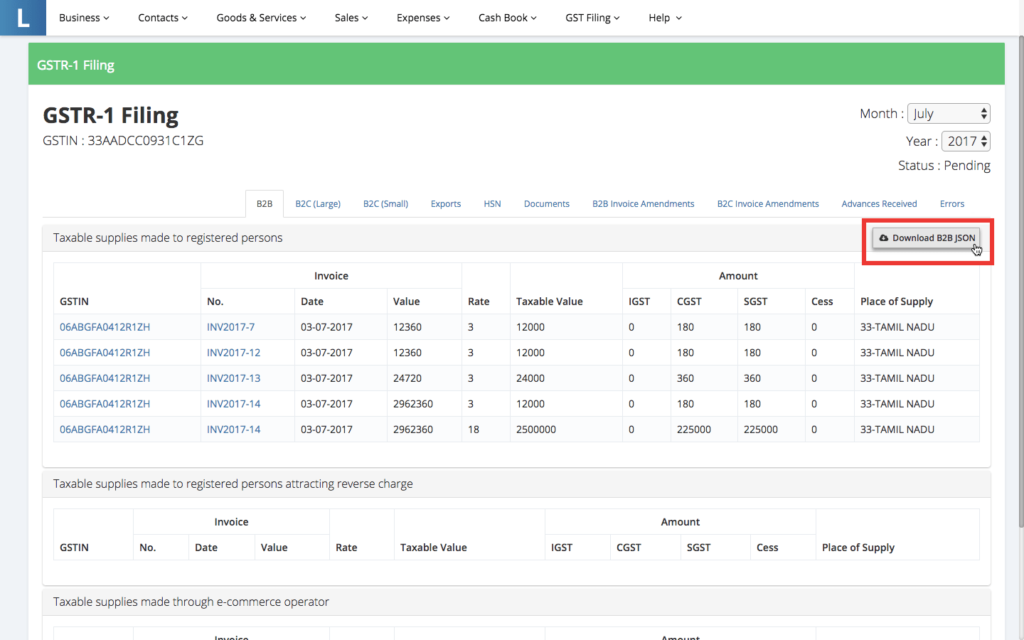
In LEDGERS, access the GSTR-1 Filing page from the top menu. GST Filing -> GSTR-1 -> Overview. Select the month you would like to file GSTR1 return from the drop-down menu. Once the data is loaded, click on “Download B2B JSON” as shown below. In LEDGERS, you can download one JSON file containing all the sections of a GSTR1 return or download the JSON files in part. JSON files can also be downloaded in parts and uploaded to the GST Portal. The following types of JSON files can be downloaded separately for GSTR1 filing:
- JSON for B2B invoices
- JSON for B2C large invoices
- JSON for B2C small invoices
- JSON for Export invoices
- JSON for HSN summary
- JSON for Invoice Amendments
- JSON for GSTR1 Return (Entire return is provided in JSON Format)
Uploading JSON File to GST Portal
Once you have downloaded the JSON file, follow the steps below to upload the JSON file to the GST portal.
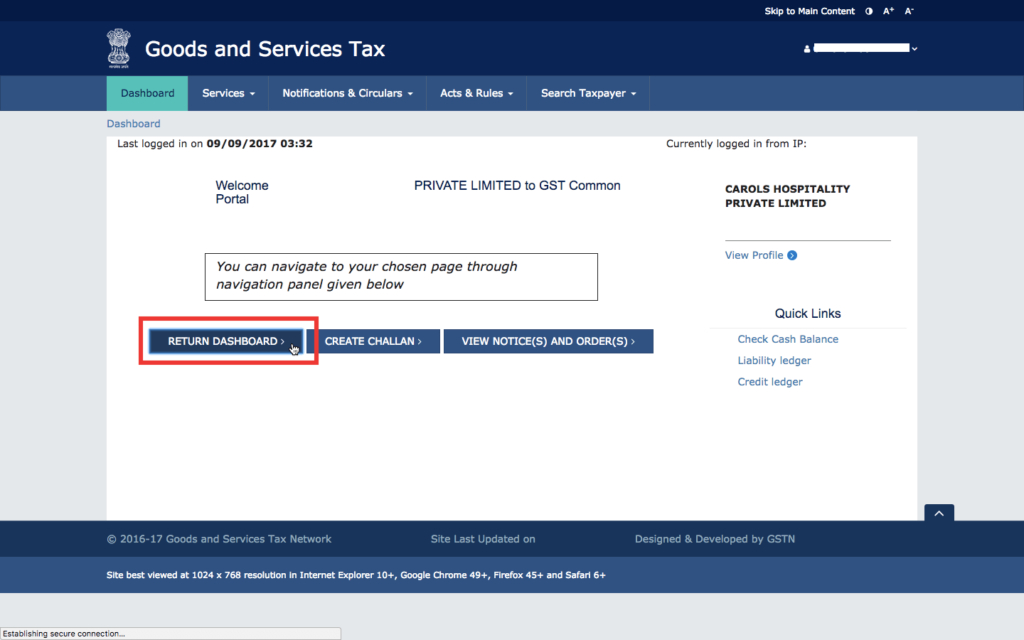
Step 1: Access your GST returns dashboard
Once you have downloaded the GST return in JSON format from LEDGERS or offline GST return tool, proceed to login to the GST portal and access the GST return dashboard.
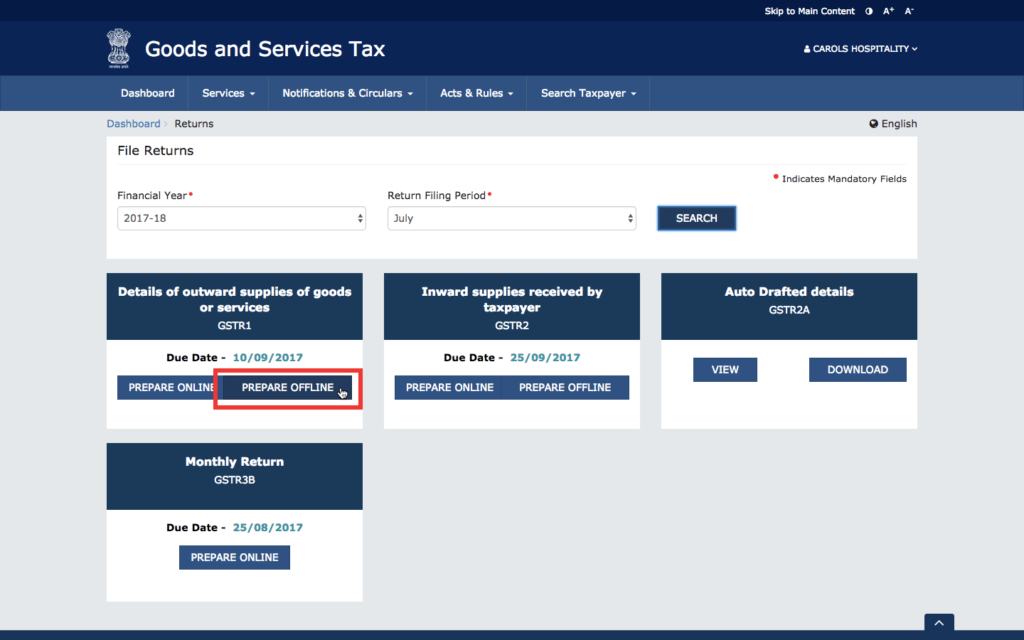
Step 2: Select the month for which GST return is to be filed
In the GST return dashboard, select the month you would like to file GST return and click “Search”. From the options, select the type of GST return to and click “Prepare Offline”.
Step 3: Upload JSON file to GSTN
Click on “Choose file” and select the location of the JSON file downloaded from LEDGERS in your hard drive. On selecting the file, the JSON file will be uploaded to GSTN automatically.
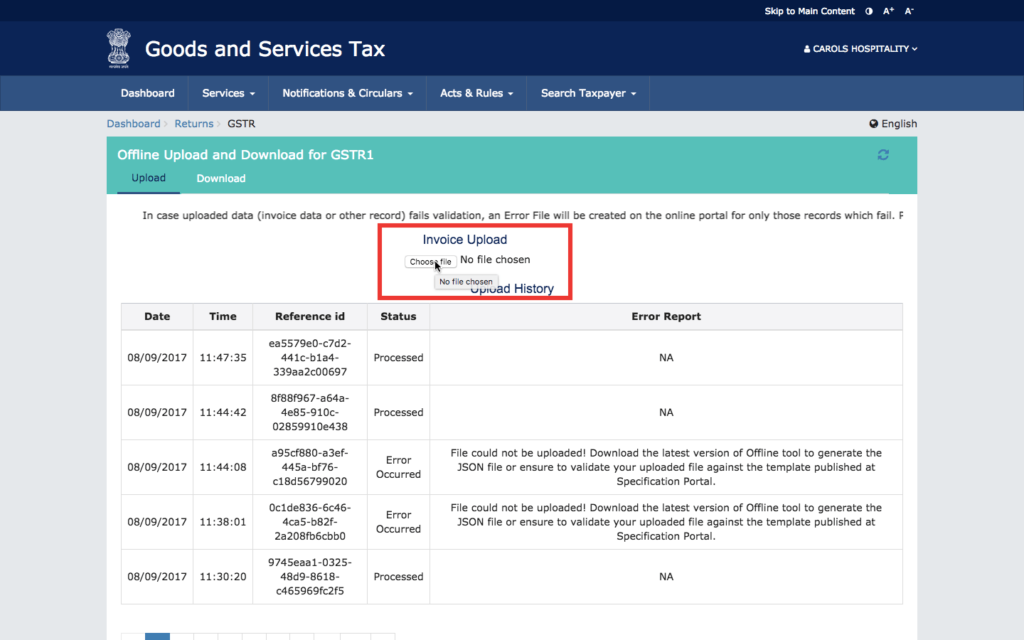
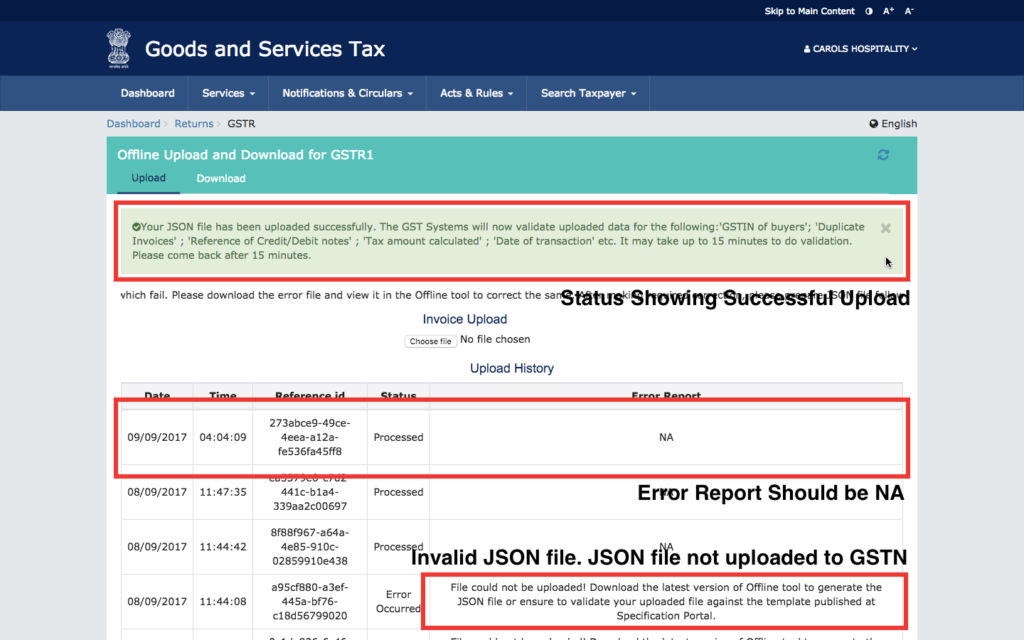
Step 4: Ensure JSON file is uploaded successfully
After the JSON file is uploaded, a confirmation will be provided if the upload is successful. In case the JSON format or structure is wrong, an error message will be generated as shown below. If the JSON file is correct, the Error Report will be NA.
Once a JSON file is uploaded, the data or invoices will be visible on the GST portal after 15 – 30 minutes. Do not upload multiple times.
If the data is not shown on the GST Portal after 30 minutes, you can try re-uploading the JSON file. If JSON file is uploaded multiple times, the data will be re-written or appended.
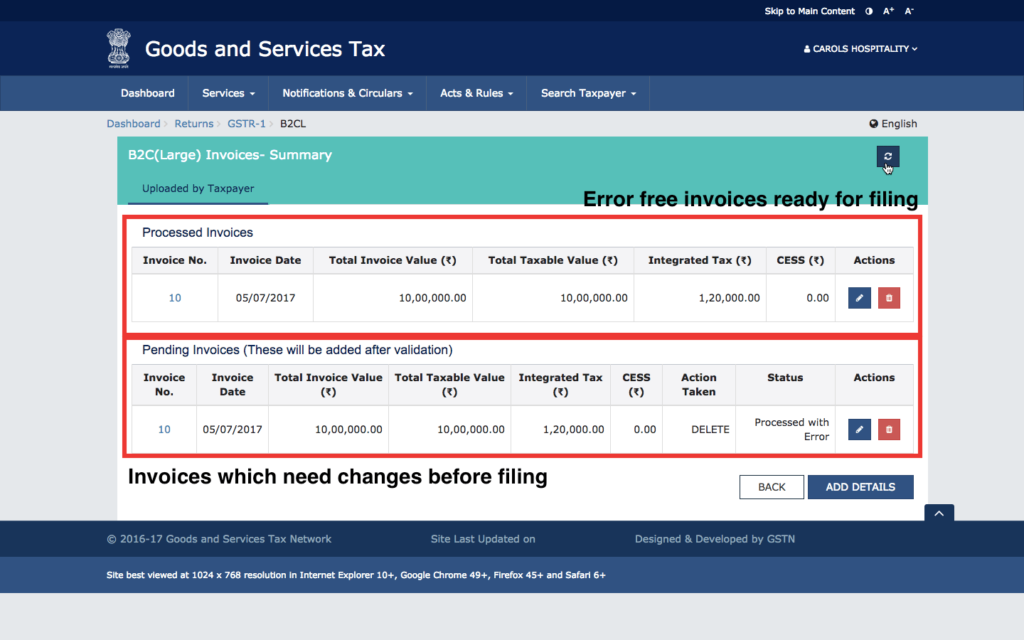
Step 5: Verify data on GST Portal
After 15 – 30 minutes of uploading a JSON file, the data will be validated by the GSTN and added to the GST portal -> returns dashboard of the taxpayer. You can click on various sections to see the data and invoices uploaded through the JSON file.
Successfully uploaded invoices without errors are shown separately. You can further edit or delete the data.
In case any additional data is required, the same is shown separately in the returns dashboard for additional input, edit or delete.
How to Upload JSON File on GST Portal?
JSON file is a type of computer file based on Java that is easy for humans to read and write. JSON file is used by the GSTN for GST return preparation and filing. GST returns can be filed on the GST Portal using a JSON file. The Government has provided an offline GST return preparation tool that generates JSON file that can be filed on the GST Portal. LEDGERS GST software also provides JSON format GST returns that can be uploaded to GST portal for easily filing all types of GST return. In this article, we look at the procedure for uploading JSON file on GST portal.
Download JSON File for GST Return Filing
In LEDGERS, access the GSTR-1 Filing page from the top menu. GST Filing -> GSTR-1 -> Overview. Select the month you would like to file GSTR1 return from the drop-down menu. Once the data is loaded, click on “Download B2B JSON” as shown below. In LEDGERS, you can download one JSON file containing all the sections of a GSTR1 return or download the JSON files in part. JSON files can also be downloaded in parts and uploaded to the GST Portal. The following types of JSON files can be downloaded separately for GSTR1 filing:
- JSON for B2B invoices
- JSON for B2C large invoices
- JSON for B2C small invoices
- JSON for Export invoices
- JSON for HSN summary
- JSON for Invoice Amendments
- JSON for GSTR1 Return (Entire return is provided in JSON Format)
Uploading JSON File to GST Portal
Once you have downloaded the JSON file, follow the steps below to upload the JSON file to the GST portal.
Step 1: Access your GST returns dashboard
Once you have downloaded the GST return in JSON format from LEDGERS or offline GST return tool, proceed to login to the GST portal and access the GST return dashboard.
Step 2: Select the month for which GST return is to be filed
In the GST return dashboard, select the month you would like to file GST return and click “Search”. From the options, select the type of GST return to and click “Prepare Offline”.
Step 3: Upload JSON file to GSTN
Click on “Choose file” and select the location of the JSON file downloaded from LEDGERS in your hard drive. On selecting the file, the JSON file will be uploaded to GSTN automatically.
Step 4: Ensure JSON file is uploaded successfully
After the JSON file is uploaded, a confirmation will be provided if the upload is successful. In case the JSON format or structure is wrong, an error message will be generated as shown below. If the JSON file is correct, the Error Report will be NA.
Once a JSON file is uploaded, the data or invoices will be visible on the GST portal after 15 – 30 minutes. Do not upload multiple times.
If the data is not shown on the GST Portal after 30 minutes, you can try re-uploading the JSON file. If JSON file is uploaded multiple times, the data will be re-written or appended.
Step 5: Verify data on GST Portal
After 15 – 30 minutes of uploading a JSON file, the data will be validated by the GSTN and added to the GST portal -> returns dashboard of the taxpayer. You can click on various sections to see the data and invoices uploaded through the JSON file.
Successfully uploaded invoices without errors are shown separately. You can further edit or delete the data.
In case any additional data is required, the same is shown separately in the returns dashboard for additional input, edit or delete.
THANKS FOR READING....🔐
👦A.SIVASANKARREDDY,
✉ sankarasr9@gmail.com
Comments
Post a Comment